Monday, December 27, 2010

Week 12: Pop-up Christmas cards


Our last Christmas project was a card for the kids to give to family.  The cool twist is that these are pop-ups, which can be really cool, but challenging.

I had two designs (snowman and tree), that I printed onto card-stock to make it easier for the kids. I got the idea from a Christmas Crafts book. They just had to follow directions about cutting and then get some help folding. Then they could decorate and glue into some construction paper for final presentation.


Here is the template. Click for larger file to print.

Week 11: Plastic painted ornaments

With the gracious help of another mother, Mary Maxwell, we did some special ornaments.  She had a supplie of clamshell type clear palstic ornaments. They were balls and stars.  We had the kids put a few quirts of acrylic paint into the inside of the clear ornaments. (the less, the better) Then they close the ornment snuggly! and shake it around. The result is a marbled look inside.


The only problem is that if the kids use too much paint, it puddles in the bottom and does not dry.  Otherwise the kids had a blast. Thanks Mary!

Week 10: Music Note Angel ornaments


For the 5-6 grade I did not do the simple snowmen I did with the younger kids. For the older students I did a project from two years ago, that remains one of my favorites.  It is an ornament made out of sheet music formed into an angel.

I made a template with downloaded sheet music, but you can just photocopy some sheet music or download from the internet. I used "Angels We have Heard on High."  Form your sheet music into cones about 3 inches tall with a small hole at the top.

Other items needed:

shiny pipe cleaners

little jingle bells

small flesh colored wood beads.  Use Sharpie to put face on.

Small 2-3" shiny or white doilies

glitter

This is what you do:

1. After cones are built, twist a jingle bell on end of pipe cleaner

2. Insert pipe cleaner up from bottom of cone thru "neck hole" 

3. Put bead "head" on pipe cleaner

4. Wrap pipe cleaner around finger and twist once or twice to make halo and keep bead on.

5. Use rest of pipe cleaner as hook.

6. Glue half-folded doiley to back of cone as wings

7. Add glitter to bottom of skirt and/or buttons etc.


Week 10: Paper plate snowmen


I'm a bit late posting these, but December can be a real bear with spare time. We had three weeks of art during the Christmas season, and there are so many good holiday projects out there, but I usually try to do some ornaments and cards.  This projects is not really either, but is a lot of fun and easy as pie...plate, that is.

I should probably write a book on art projects made from paper plates (or find the books that undoubtedly have already been written!)

This project uses three plain white paper plates. I used a large and two smaller ones. I attached them with the metal brads that look like thumbtacks with wings.  Then it is up to the student to make a hat, scarf, boots, face and buttons out of whatever you have on hand: paper, twigs, pipe cleaners, sequins, puffballs, etc.

Each one turns out different and really cute.


F
For those who finished early, I showed them the classic paper plate dove from my childhood.

Friday, December 3, 2010

Week 9: Thanksgiving Pasta Collage


What's Thanksgiving without food?  I wanted to use that theme in a mosaic/collage way, so I brought out the trusty dried pasta and beans.  I ended up buying a bunch of different bags of pasta and beans, so that the kids would have a variety of shapes and colors to work with.


To keep to the theme, I had a few samples of holiday images like turkeys, pilgrims and cornucopias for the kids to draw inspiration from. For the 1-2 graders, I predrew some pilgrims on their cardboard, so the whole time was not spent drawing.  The fun part is gluing the pasta!

Once the kids got a a drawing on their cardboard, they could start gluing. The turkeys ended up looking great with the multicolored/shaped pasta like spirals and bow-ties. The Pilgrims really benefied from black beans and rice along with the lacey pastas and wagon-wheels.


Tuesday, November 9, 2010

Week 7: Henri Matisse collage


PANEL WITH MASK

1947
In my continuing efforts to introduce famous artists every so slightly into the curriculum, I talked to the kids about French artist 
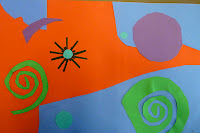
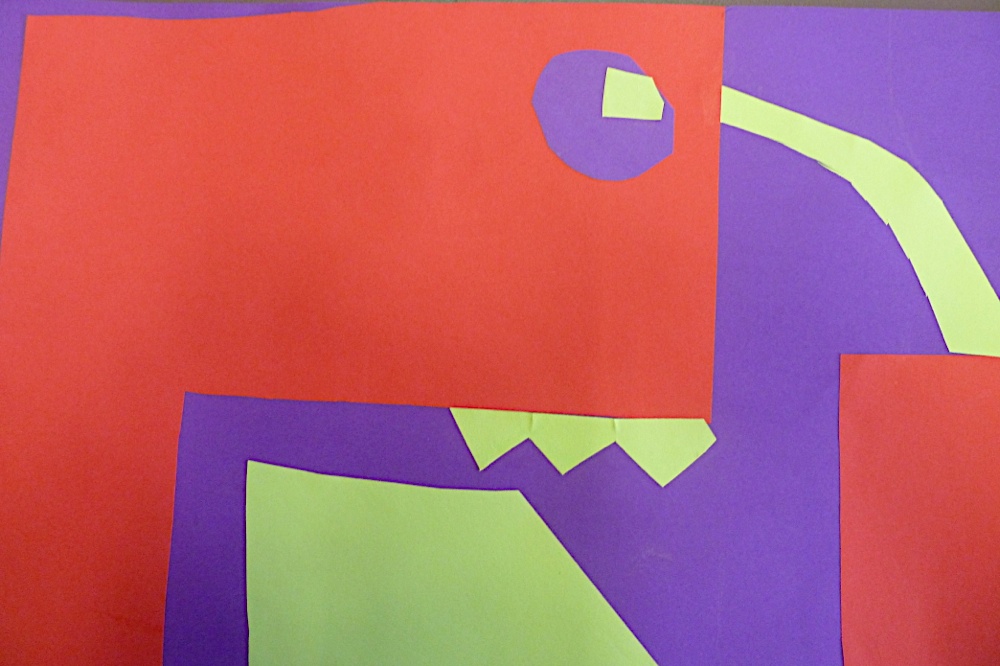
Henri Matisse. He is a very famous painter, but at the end of his life, in the 1940s, became well known for his collage cutouts that he said were "painting with a brush."

I have done a bunch of drawing projects and emphasized line this fall, but this project had the goal of emphasizing several other things:
1. Abstract, graphic art
2. Color, with an emphasis on bright primary and secondary colors
3. Shape, with an emphasis on variety
4. Heirarchy, from large bold shapes to inticate small shapes
5. Layering of imagery to create dynamic compositions

To accomplish this, the kids were to pick two pieces of paper (one primary and one secondary on the color wheel) One of these was the background, the other was to be the large background shapes (Matisse often had background blocks of color). I tried to emphasize to the kids to make the large shapes alrge and bold and not too intricate. After they had done these two colors, they could choose two more colors from the scrap bin to use as medium and small shapes (Matisse had many smaller intricate shapes). I wanted the students to experiment with different shapes and not try to be literal.


Week 6: Halloween Black Cats


To celebrate Halloween without the pumpkins, ghosts and skeletons, I came across the idea to draw a black cat with bright glowing eyes. The kids had really enjoyed doing a directed drawing last year for the the Year of the Tiger, and this became a similar project.

I had them use black paper, white crayons and bright oil pastel. I wanted them to just color the eyes and amybe the background but leave the cat face black paper.

Wednesday, November 3, 2010

Week 5: Fall leaves watercolor


We've been doing a lot of drawing and line work this Fall, but I wanted to add in some painting-this time watercolor.

For this assignment, I had the kids view various leaf shapes and try to understand their symetry and layout. Then we drew a leaf shape (it could be very realistic or more whymsical) on a piece of white watercolor paper with a light crayon. The idea of wax resist was also part of this lesson.

Next they use watercolor in various ways to get color. Blotches, stripes, wet-on-wet, and spatter were all used.

The kids did seem to really get ino the painting part!

Week 4: Stained glass names

For the younger kids who don't write in cursive yet, I did not do the cursive insect names, but instead did some straight-line stuff. I had the first and second graders use rulers and pencil to make several boxes ona piece of paper that corresponded to the number of letters in their names. We have a short-named group, so that is nice:-)

In each box I instructed them to draw uppercase letters and use straight, bold lines in black marker. I wanted the end result to be a box with multiple "windows: with positive and negative shapes. The use of line, and positive/negative shapes is a big focus of these frist two months.


In each "cell" created I told the kids to color one color and the final result is very graphic!

Friday, October 15, 2010

Week 4: Cursive Insects


Here was a fun project inspired by several of my favorite art teacher blogs.  Its also another way to incorporate the kids' names into a  project.

The first step was to have the student choose two different colors of paper, one for the background and one for the "insect."  They fold the foreground page in half long-ways.  With the fold down, they write their name large and in cursive with the fold as the baseline. Ignore descenders.  Then they can make a bubble outline around their name or just eyeball it. Using scissors they cut ut their name, making sure to leave enough areas along the fold so as to not separate the two halves. (even if you do that fine, though). Then they unfold, glue down and decorate.  Sometimes they end up looking like aliens or birds or frogs. It a lot of fun. Much like an inkblot test.  Can you decode the names?